SketchUp to Render: How to Turn a 3D Model Into a Photorealistic AI Render
SketchUp is where the design lives, but a SketchUp viewport isn't a presentation image. The fastest way to a realistic render is to export the model the right way, choose between a quick screenshot and the full 3D workflow, then style and refine — not to fight a single prompt.
This guide covers the practical version for architects and designers using Render a House: how to export from SketchUp, which upload path to pick, and how to get believable output without letting the AI redesign your building.
Quick answer
Export a clean 2D screenshot for fast concept looks, or export glTF Binary (.glb) and use 3D Preview when the job depends on real-site context, exact camera framing, or consistent multi-view work. SketchUp's native .skp is never uploaded directly — you export first.
Watch the walkthrough
The full six-minute walkthrough — exporting from SketchUp and placing the model on a real map in 3D Preview (in Spanish).
Key takeaways
- SketchUp's native .skp can't be uploaded — you always export first. The format you pick decides how much control you get.
- Export a 2D screenshot (JPEG/PNG) for fast concept looks. Export glTF Binary (.glb) and use 3D Preview when you need real-site context, exact camera angles, or consistent multi-view sets.
- A clean model renders cleaner. Hide tags and clutter, keep only what you'll show, and export at real-world scale.
- .glb is the recommended 3D format — a single file with textures embedded. .gltf and .obj also work; modern SketchUp exports glTF natively.
- Don't judge the first render. One or two deliberate iterations — style, time of day, a reference image — do most of the work.
Two ways to go from SketchUp to a render
Both start in SketchUp and end in Render a House — they differ in how much control you keep over the site and the camera.
Upload a SketchUp screenshot (fast)
Frame a good view in SketchUp, export a clean 2D image, and upload it as a regular image to restyle it.
- Best for early concept exploration and quick client looks.
- You don't need the building to sit on its real site.
- You're still iterating on the design, not the presentation context.
Usually the fastest route from SketchUp to a believable image.
Export .glb and use 3D Preview (full control)
Export the model as glTF Binary and place it on real satellite terrain, where you control the camera and render from saved angles.
- Best when the building must sit in a real map location with real surroundings.
- Save perspectives and render from those exact views later.
- Stronger consistency across several client-facing images.
Usually the stronger workflow for site context and presentation control.
For the full per-tool export reference, see Export your 3D model and Supported File Formats.
Export your SketchUp model cleanly
Weak results often start before the file reaches the model. A tidy export gives the AI less to guess and keeps your geometry intact.
Hide what you won't show
Turn off tags/layers, scenes, and helper geometry you don't need. The cleaner the model, the cleaner the render.
Export at real-world scale
glTF uses 1 unit = 1 meter. Modeling at real scale means the building drops onto the map at the right size — you can still rescale in 3D Preview if needed.
Keep the mesh reasonable
Very dense models upload slowly. Prefer .glb over multi-file .gltf so textures stay bundled, and simplify heavy components when you can.
Pick the right format
Use .glb for the 3D workflow. For a screenshot upload, use JPEG for shaded views and PNG for line/iso drawings.
Step by step: from SketchUp to render
Tidy the model
Hide the tags, scenes, and helper geometry you won't show, and delete obvious clutter. You can always add more objects inside 3D Preview later, so export only what you need for the shot.
Export from SketchUp
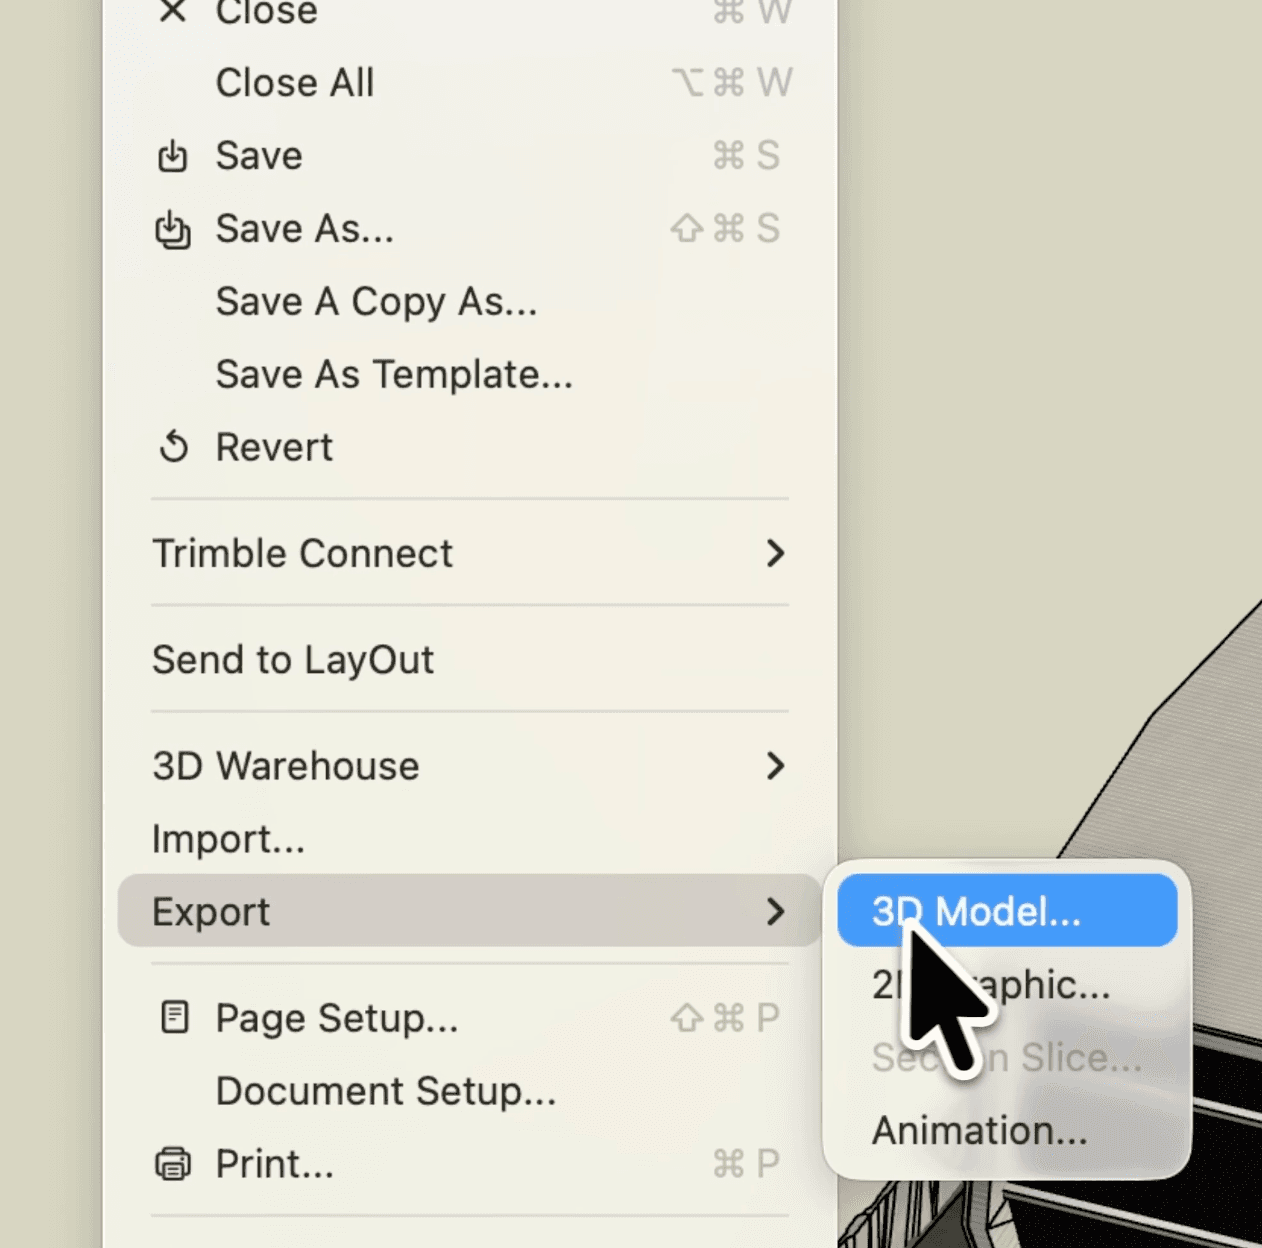
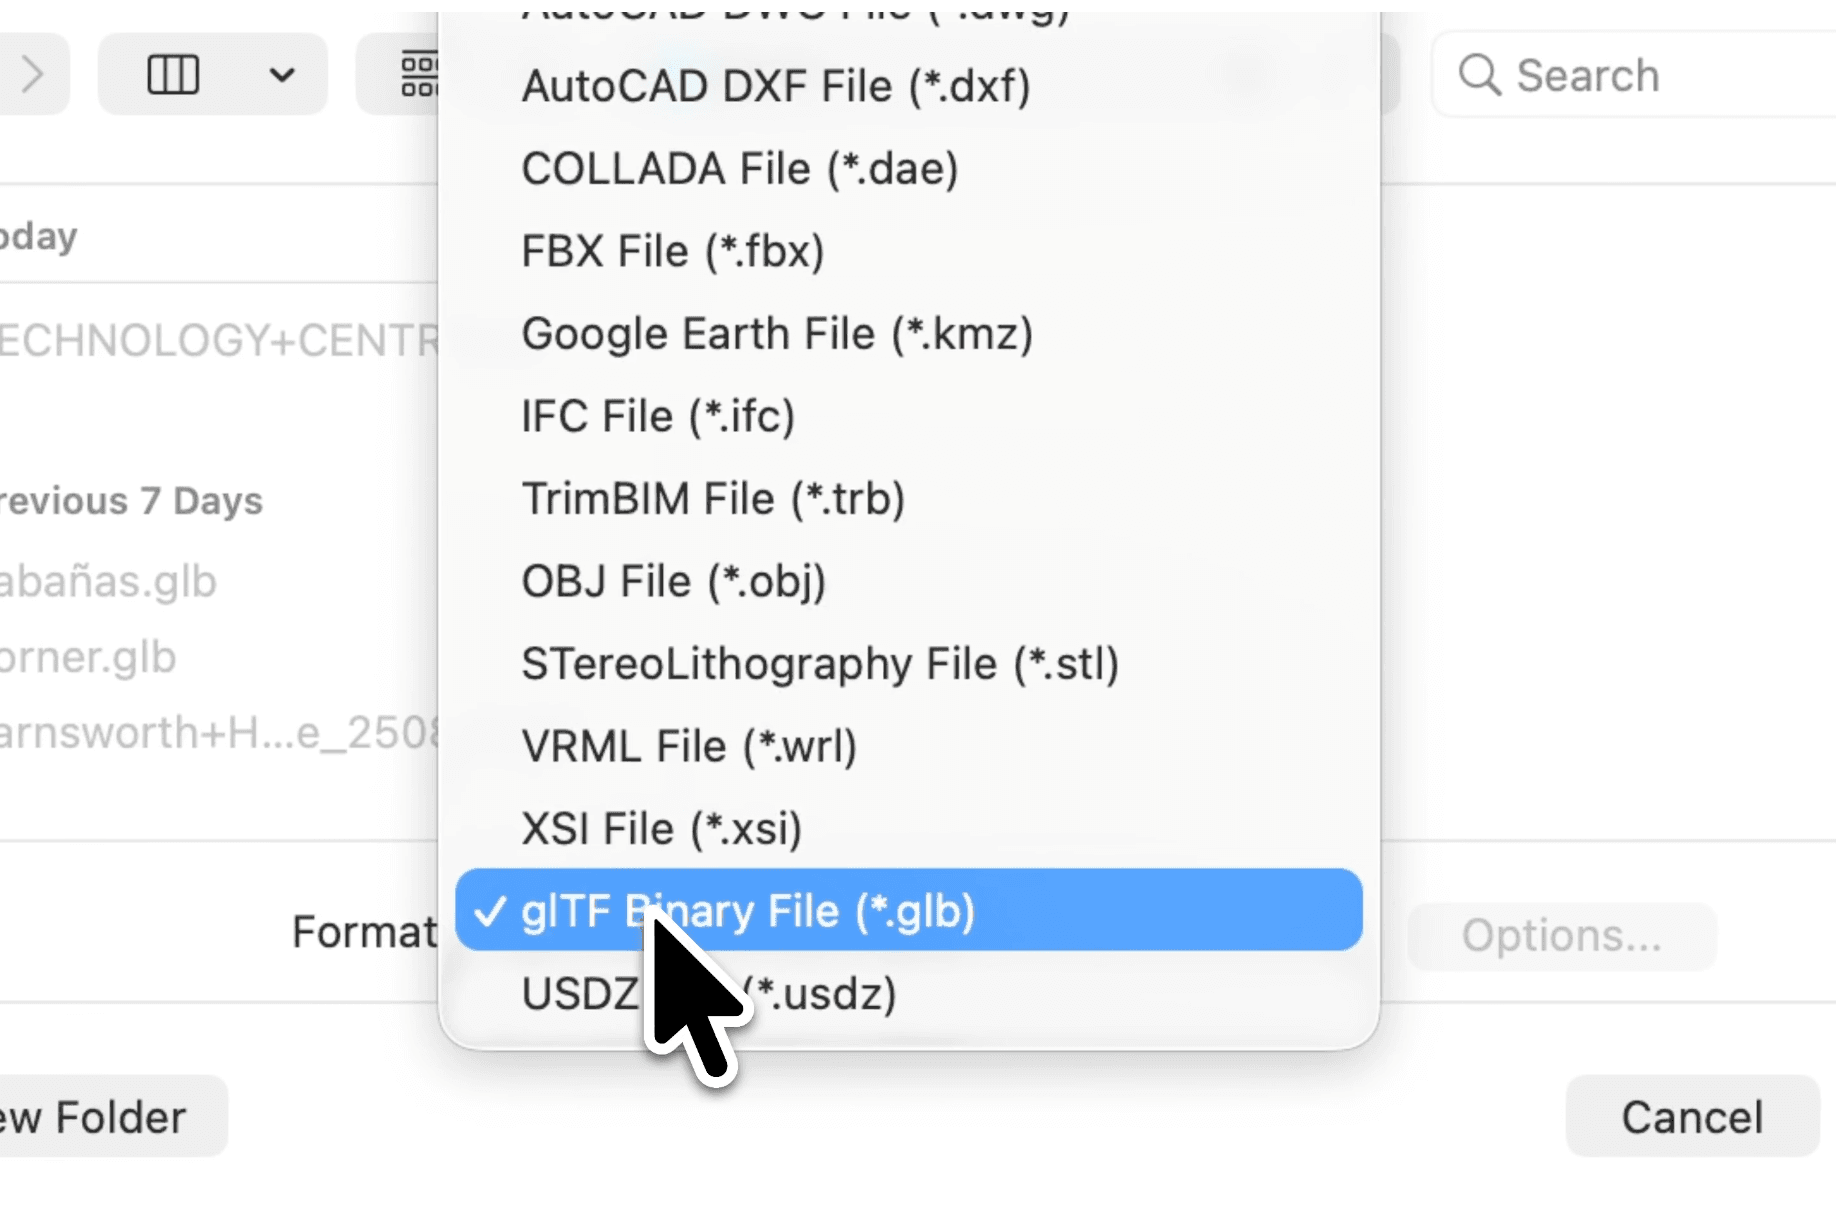
For the 3D workflow, go to File → Export → 3D Model… and choose glTF Binary File (.glb). Modern SketchUp exports glTF natively — no extension needed.
For a quick restyle instead, export a clean 2D image of your framed view (JPEG for shaded views, PNG for line or isometric drawings).
See Export your 3D model for the exact menu steps and the .obj fallback.
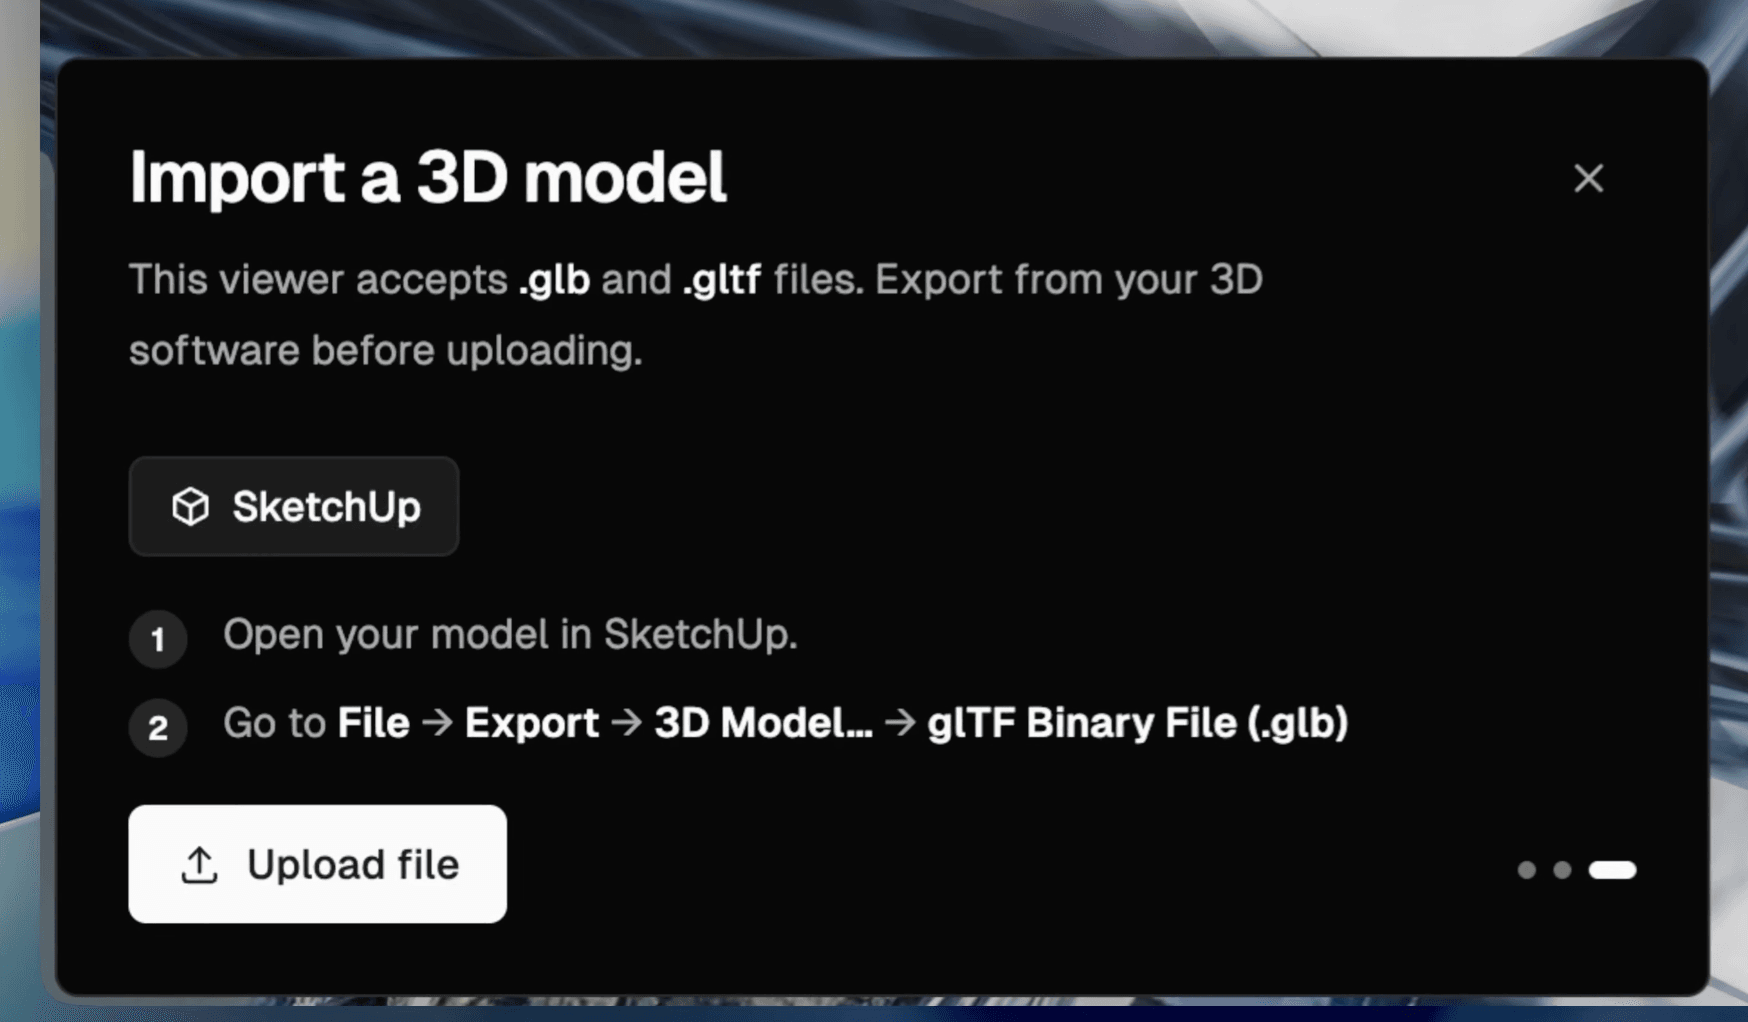
Upload to Render a House
Upload the screenshot as a regular image to restyle it, or open 3D Preview and upload the .glb to place it on a real map.
See Upload Your Design and 3D Preview.
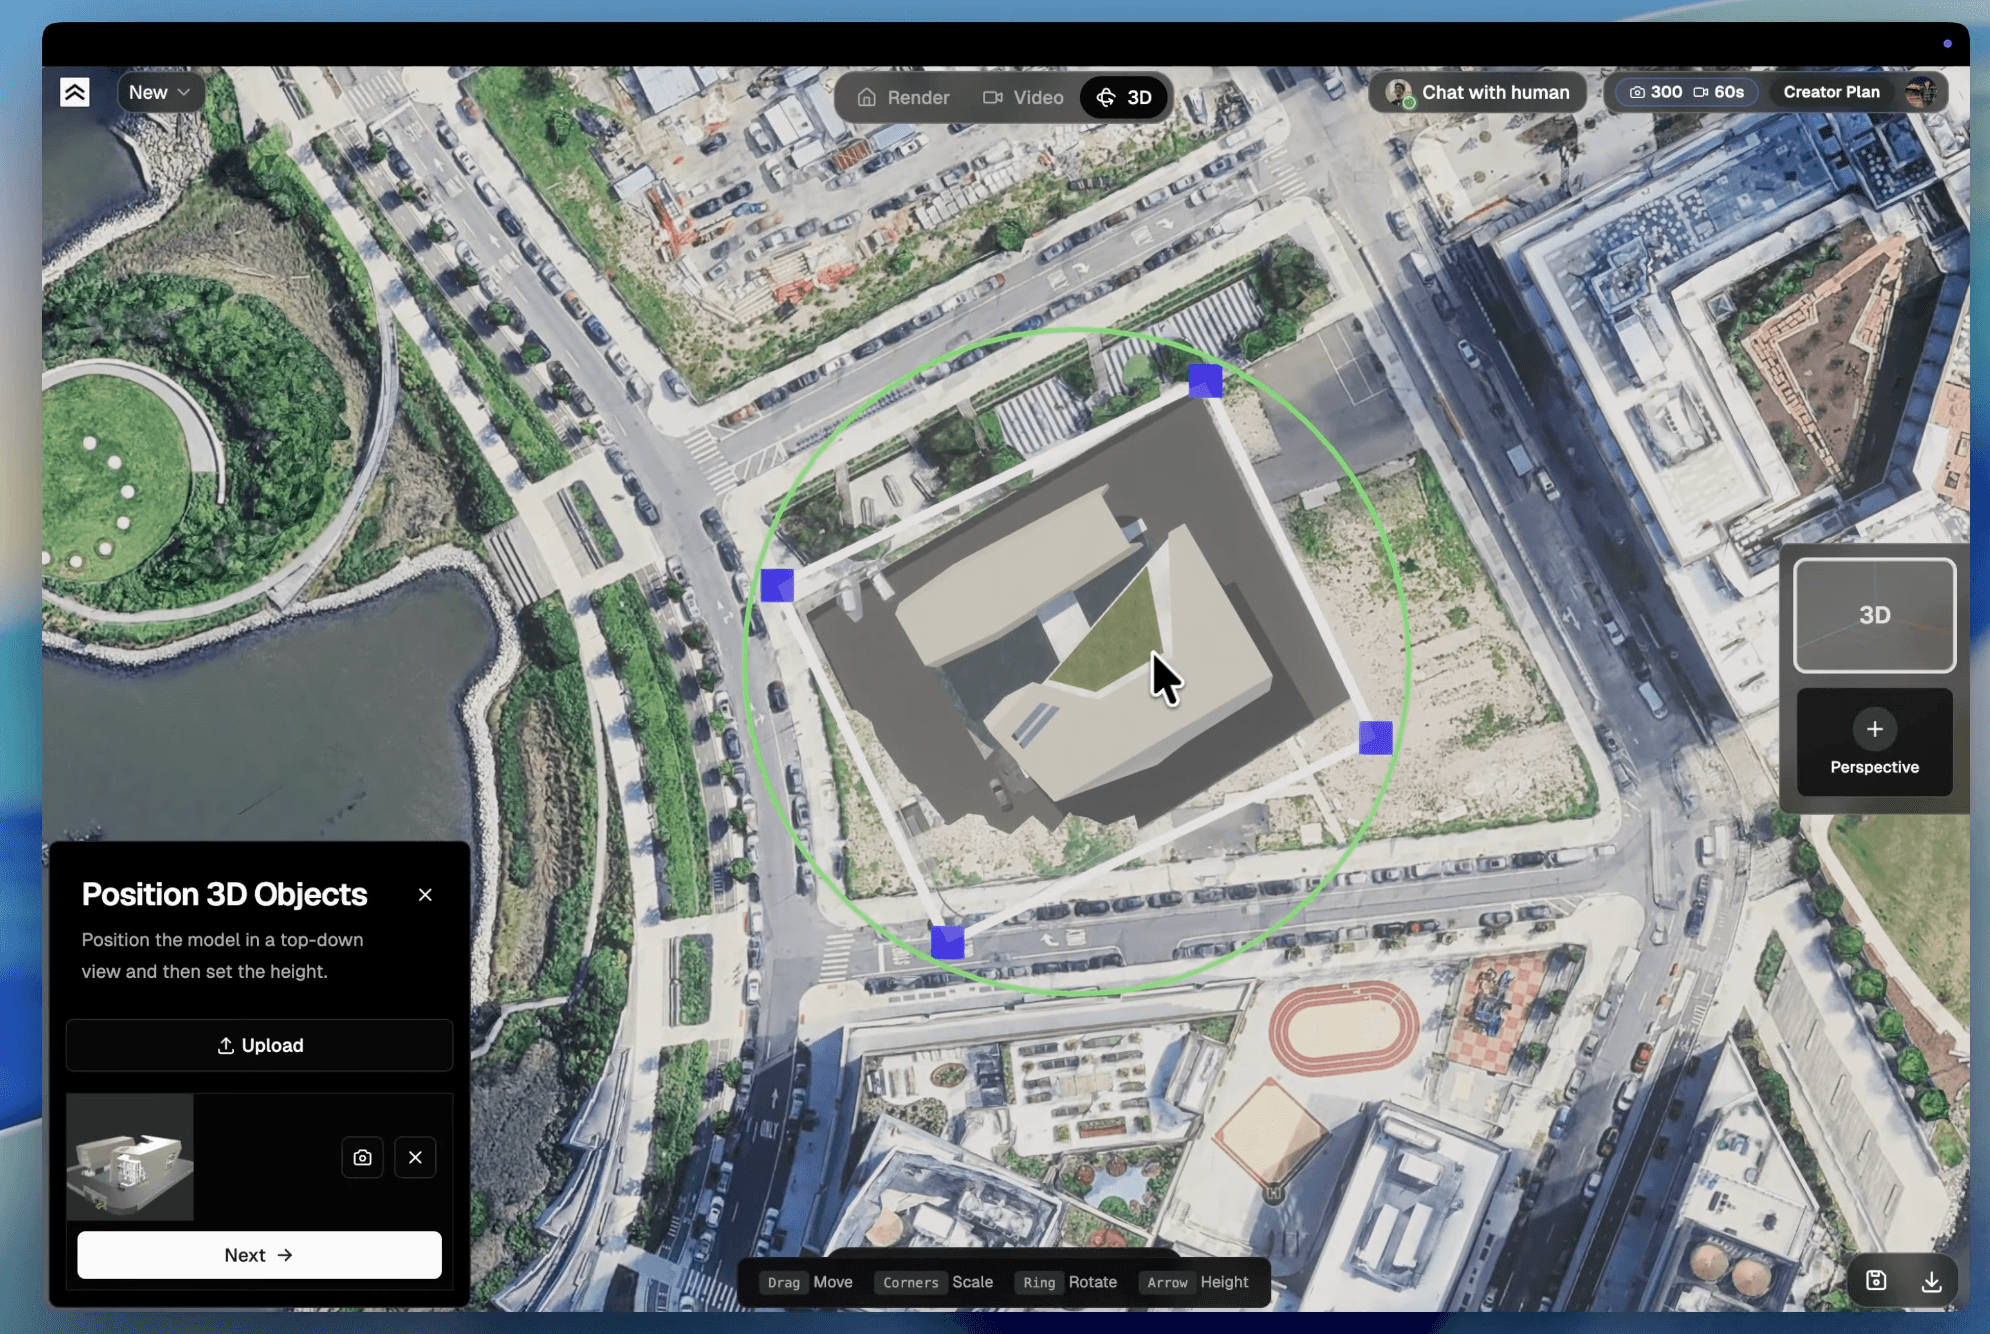
Place it on the real site (3D Preview)
If you went the .glb route, set the location, then flatten the terrain to clear the existing building, and position your model with the move, scale, rotate, and height tools. Save a camera angle as a perspective to render from.
Choose a style and write a short prompt
Pick a style that matches the stage of the project, and keep the prompt grounded in the model — name the materials and lighting, and say when geometry should stay close to the source.
Keep the original geometry. Modern white stucco facade, warm oak details, soft afternoon light, realistic shadows.Preserve roof shape and window placement. Concrete base, black metal frames, landscaped front yard, overcast daylight.Photorealistic but faithful to the model. Keep proportions, add subtle stone texture, warm dusk lighting.
See Choose a Style.
Generate, compare, refine, and export
A normal render typically takes about 30–60 seconds. The real quality usually comes from one or two deliberate iterations — not the first pass.
Fix weak outputs without starting over blindly
The building changed too much
- Avoid the "Real photo" style on the next pass.
- Tell the model to preserve geometry and proportions.
- Start from 3D Preview so the geometry is locked by the model, not guessed from a flat image.
The image still looks unrealistic
- Add clearer material and lighting instructions.
- Upload a style reference if the visual target is specific.
- Try a different time of day instead of only rewriting the prompt.
Only one area is wrong
- Use "Edit this image" instead of rerendering the whole scene.
- If more than about 30% needs to change, generate a new version instead.
The screenshot is too weak
- Re-export a cleaner, tighter view at higher resolution.
- Switch to the .glb + 3D Preview path when you need context or camera control.
The rule of thumb: if more than about 30% of the image needs to change, generate a new version. If the issue is local, edit the image instead.
Final recommendation
If you just need a fast concept look, a clean SketchUp screenshot plus a focused prompt is usually enough. The moment the job is about real surroundings, an exact camera angle, or a consistent set of client images, export a .glb and work in 3D Preview — the model locks your geometry so the AI styles the building instead of reinventing it.

Start by exporting the model, then keep 3D Preview open for the placement and camera work.
Related guides
- Sketch to Render AI — turn architectural sketches into realistic renders.
- AutoCAD Rendering Workflow — when to export an image vs. a model from AutoCAD.
- Floor Plan Render — turn a 2D plan into a realistic visualization.
- Render Variations — explore multiple design options from one upload.
FAQ
Can I upload a SketchUp .skp file directly?
No. Render a House accepts JPG, PNG, and WebP for image uploads, plus GLB, GLTF, and OBJ for 3D. SKP isn't a direct upload format, so you export a screenshot or a .glb from SketchUp first.
What's the best format to export from SketchUp?
For the full 3D workflow, export glTF Binary (.glb) — a single file with textures embedded. For a quick restyle, export a clean 2D screenshot: JPEG for shaded views, PNG for line or isometric drawings.
Do I need an extension to export glTF from SketchUp?
Modern SketchUp exports glTF natively via File → Export → 3D Model. Older versions that don't can export .obj instead, or you can upload a 2D screenshot.
Does my model keep its scale and proportions?
Yes. A .glb keeps the scale you modeled at (glTF's convention is 1 unit = 1 meter), so it lands at the right size in 3D Preview. You can still scale, rotate, and set its height on the map.
How do I render my building in its real surroundings?
Use 3D Preview: set the real-world location, flatten the terrain to clear the existing footprint, position the model, then save a camera angle and render it with real context, shadows, and neighbors.