Refine and Iterate
Once you have a render, this is how you make it better — generate a new version or edit this image.
A first render is almost never the final. Once a render is on screen, every follow-up falls into two modes: generate a new version, or edit this image. This page covers both, plus the tools that surround them.
📺 Prefer to watch? See this flow in the walkthrough on YouTube: Crear renders realistas desde SketchUp o Revit (in Spanish, from 5:10).
Two ways to iterate on a render

After your first render, the chat assistant will offer two paths (and choose automatically if your request clearly fits one of them):
Generate a new version
Best for broad or global changes — the AI remakes the image from scratch using an updated brief.
Use it when:
- The environment or street context is wrong
- The image doesn't look realistic enough
- The building looks too old / dirty / plastic / off-style
- You want to switch day ↔ night, sunny ↔ snowy, summer ↔ autumn
- The composition or most of the scene needs to change
Edit this image
Best for local changes — the current image stays, and the AI only touches the part you point at.
Use it when:
- You like the image overall
- You want to remove a specific object
- You want to add a specific object in a specific place ("add a tree here")
- You want to change one material or a localized area
Rule of thumb: if more than ~30% of the image needs to change, pick Generate a new version. Otherwise, Edit this image.
Both modes converge when you land on a render you're happy with.
The toolbar
Once a render is done, a toolbar appears at the bottom-right of the viewer:
- Enhance (Improve Quality) — higher-resolution version of this render
- Compare — view the current render against the original upload
- Download — save as PNG or JPG
- Share — public URL (read-only)
- Plus, at the left/bottom of the prompt input: References and Select


Compare
Click Compare to see the original drawing image. Useful for client meetings — it shows the transformation clearly.
Improve quality (Enhance)
Enhance (tooltip: "Improve Quality") takes the current render and generates a higher-resolution, sharper version. Good for prints, large screens, or when the default render looks soft.
- Uses one credit
- Saves the result as a new render (a child of the original), so the original stays available — open All Renders or use Compare to switch back
- The platform also applies a lighter upscale automatically at download time, so you don't always need Enhance just to get a clean export
If Enhance makes the image worse (can happen with very small base images), re-render at a higher input resolution and try again.
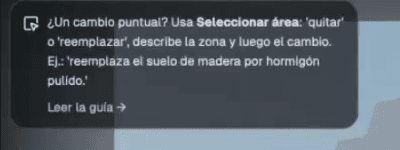
Select area (inpainting)
Need to change one thing without touching the rest? Use Select:

-
Click Select next to the prompt box
-
A mini toolbar appears with drawing tools:

- Cursor / X — activate the selection / clear it
- Hand — pan the image while zoomed in
- Lasso — freehand selection
- Rectangle — rectangular marquee
- Polygon — click to drop points and close a polygon
- Trash — delete the current selection
-
Draw an area around what you want to edit. The selection outlines in red

-
Write a short, specific prompt for that region: "add a tree here", "replace chairs with black leather dining chairs, keep everything else unchanged"
-
Hit the submit arrow
Describe the selection before you submit. The model is far more precise when your prompt names what's inside the mask, so give it three things:
- What you selected — "this is the curb along the street"
- The action — add, remove, replace, or modify
- Why — "so it lines up with the road"
So instead of "fix this", write "the selected curb — modify it so it aligns with the road."
Tips:
- Keep prompts short and concrete — one instruction per region
- Use Select for material swaps, removing clutter, and fixing specific details
- Hit
Escto deselect the mask if it stays stuck
Copy Render
Want the same style, materials, and lighting across different perspectives of the same building? That's Copy Render — a Pro feature that lives on its own page: Copy Render.
All Renders
Every render you generate in a view is saved. To see them all:

Click the stacked-cards icon in the bottom-left of the viewer. A side drawer opens showing every render for the current view:

Click any render to open it. Past renders don't expire and don't cost extra credits to revisit.
You can also use Undo / Redo to step between consecutive renders without opening the drawer.
Show / hide chat
The chat assistant lives in a panel that can be collapsed. Toggle it with Show chat / Hide chat at the top of the prompt input:

Hide it when you want more room for the render; show it when you want to go back to the conversational flow.
Iterating without burning credits
Credits are consumed only when the AI runs (Render, edits, Enhance). Browsing, comparing, zooming, switching history, and opening All Renders are all free.
Explore cheap, finish sharp. Every edit and iteration lets you pick the model and resolution again — they aren't locked to your first render. When you're just testing materials or chasing ideas, drop to Standard + 1K: that's a single credit per image and quality barely matters while you experiment. Once you land on a direction, redo it on Pro + 4K for the client-ready version.
When a render goes wrong
Common issues and fixes:
The AI changed the building too much. Switch off "Real photo" and describe realism in the prompt. Add: "Keep original materials, textures and colors exactly as in the input, do not modify geometry." Use Select to confine changes.
The lighting isn't what I wanted. Switch Time of Day. Golden hour and dusk are often more cinematic than noon. Or edit: "Warm late-afternoon light, soft long shadows, no white sky."
The surrounding context is off. Change Location, or upload a reference photo of the real environment under References → Styles or Materials and call it out in the prompt.
Parts of the building are wrong. Upload references of the correct material or angle. Use Select to apply them only where they matter.
After 3–5 tries it's still off. Download the best render so far and start a new project using it as the base. This resets the AI's context and often produces better iteration headroom.
Feedback
If a render really misses the mark and you think it's a tool problem (not a settings problem), reach out via Chat with human in the app. The team reads everything.